

%20Blog%20thumbnails%20.jpg)
How to do Spinal Decompression at Home Safely and Effectively
I’ve learned that lower back spinal decompression can be a total game-changer—when done the right way. With just a few simple techniques —like using a Swiss ball for decompression, performing self-traction on a countertop, or investing in a reliable home traction device- you can create real space in your spine right from home.
The best part? It doesn’t have to be complicated. Once you’ve addressed conditions like sciatica, stenosis, or herniated discs, these methods can easily become part of your daily routine. Safe, effective spinal decompression can happen right in your living room, no fancy equipment or considerable expense required.
Here’s why it matters: relieving pressure through spinal decompression can make a significant difference in managing pain and improving mobility—but there are a few key things to keep in mind before you get started.
How Do I Decompress or Traction my Lower back?
I often use the Swiss ball because it’s easy to use and I have it in my garage. There are a few ways you can do it, but I have found that the Swiss ball or even the counter top method is rapid and effective. After doing all of these with my clients. Here’s what I recommend.
- The Swiss ball method for those who have arthritis and general stiffness.
- The counter top method for those who have a lot of upper body strength.
- The decompression device, if you want that little extra pull and separation (not an inversion table!).
Swiss Ball Lumbar Decompression (My Personal Favorite)
What you need: 65cm Swiss ball
As an Amazon Associate I earn from qualifying purchases
Setup:
- Belly on top of the ball, head down
- Arms hanging down naturally
- Feet and knees touching ground for safety
- Completely relax
The key: Complete muscle relaxation. I tell patients to "relax everything from your toes to your tongue."
Safety rule: No pain down the leg. Back discomfort can be normal, but if you feel shooting pain in your glutes, hamstrings, or calves, stop immediately. This indicates nerve peripheralization. If your back is sore, try breathing into it!
Duration: Start with 1 minute, work up to 5 minutes as comfortable.
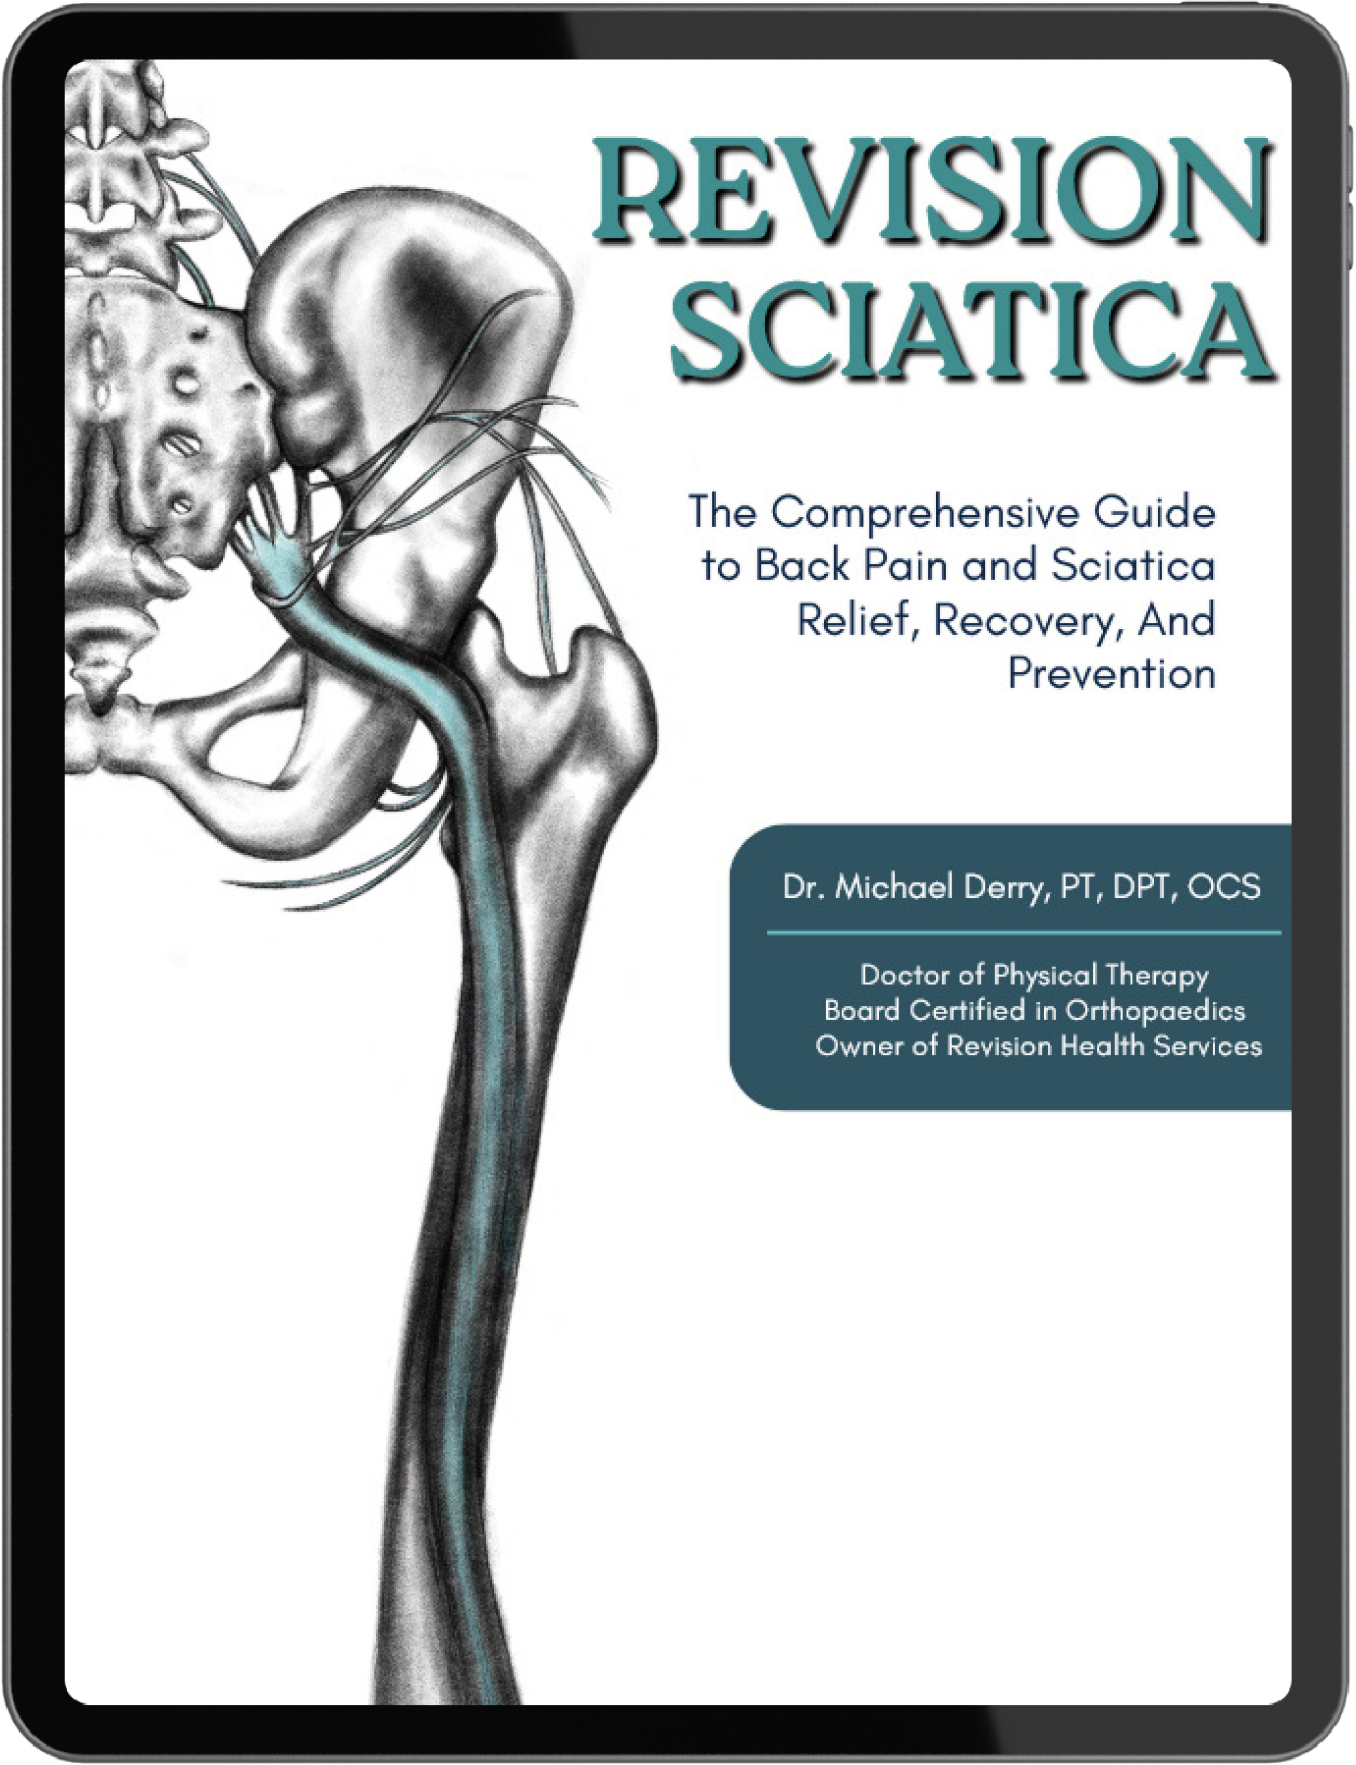
In my experience, patients who combine this with nerve glides see the best results. It's part of what I call the SPARK program - Strengthening, Pain relief (traction), Activating the nerve, and Regaining mobility, Keep Moving. It’s all laid out in my book Revision Sciatica - This is the go-to guide for complete relief and future prevention of sciatica!
Standing Lumbar Traction On Counter
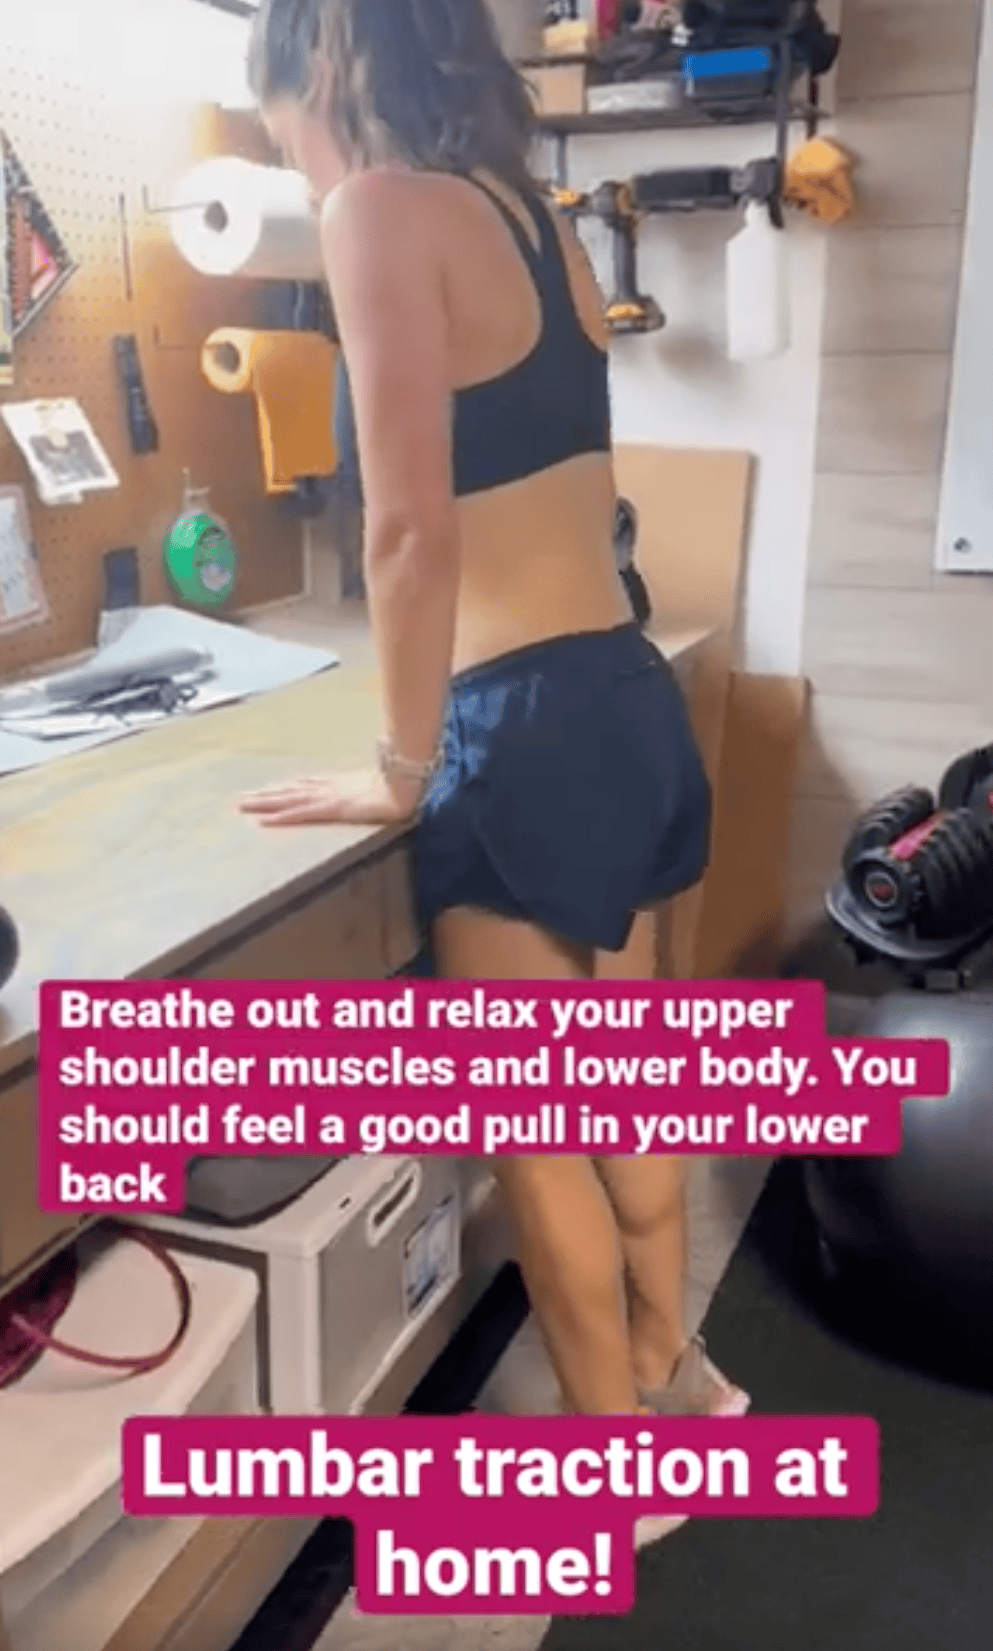
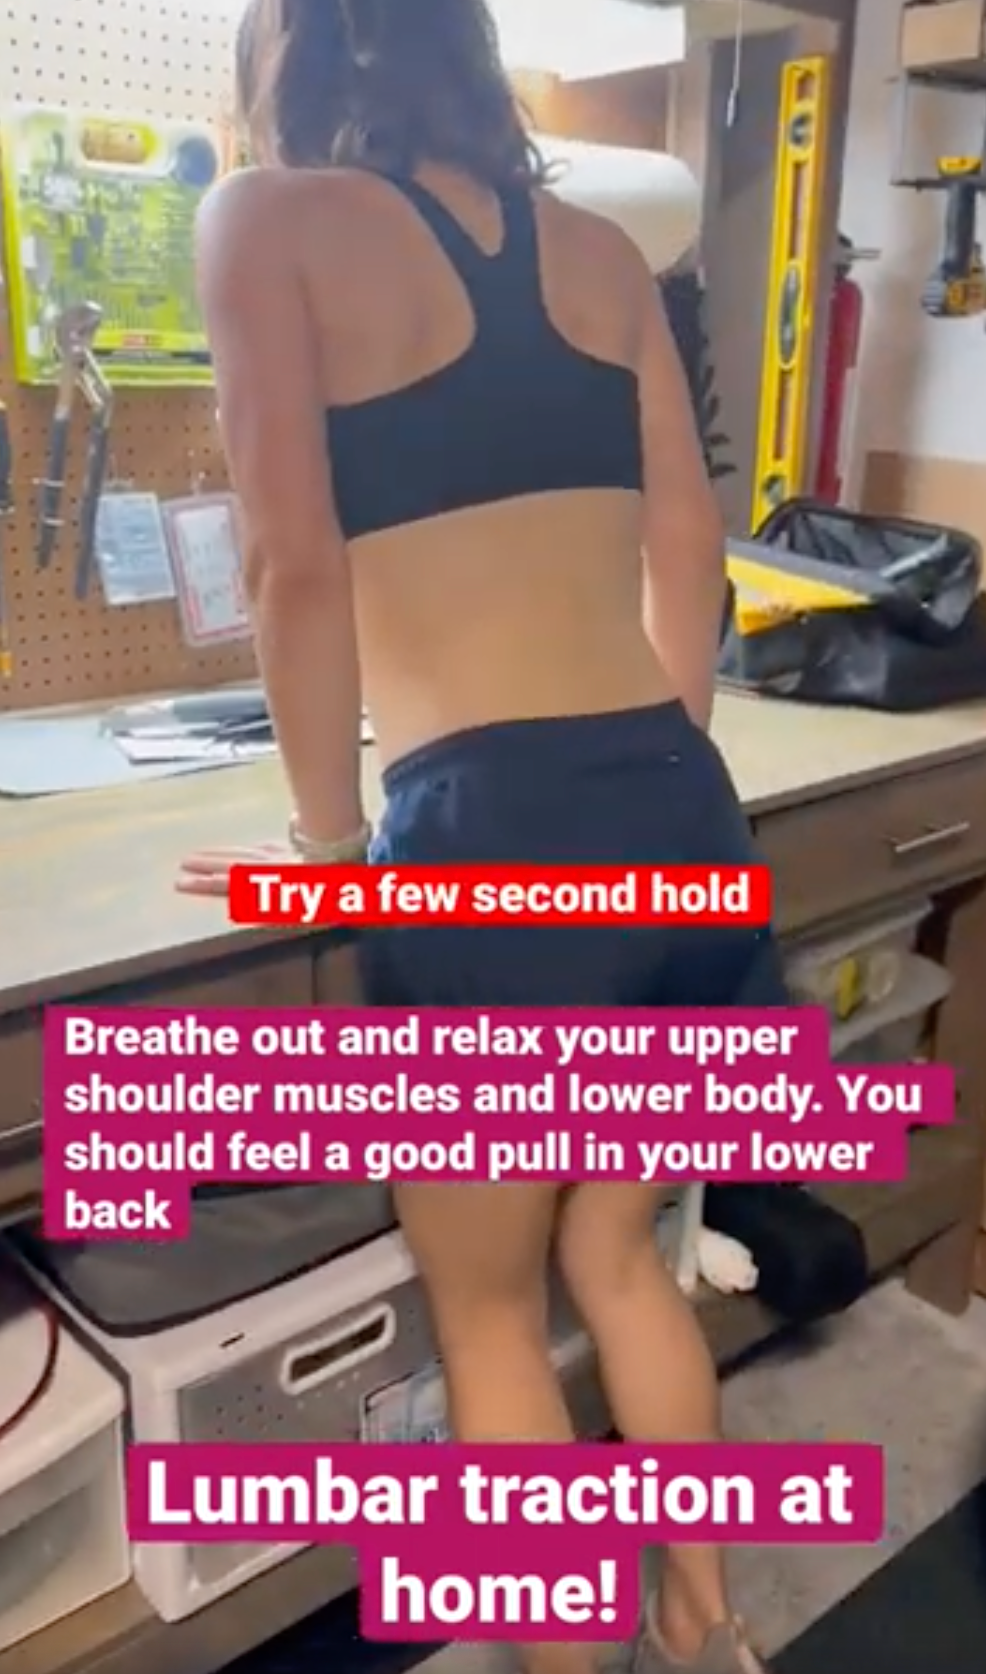
No equipment needed!
- Find a sturdy surface near waist height like a counter top
- Shift your weight into your hands and lean forward slightly
- Slightly bend your knees and relax your body
This can be done in so many different places!
Dead Hang Method
Equipment: Pull-up bar and step stool
Technique:
- Use the stool to grip the bar without jumping
- Hands just outside shoulder width
- Keep feet on the stool initially
- Gradually bend knees to transfer weight to the bar
- Never fully hang if you have shoulder issues
The most common mistake I see: People try to hang with full body weight immediately. Start with 50% weight transfer for 20-30 seconds.
In my book "Revision Sciatica," I discuss how research shows that around 3mm of spinal separation can be achieved with proper traction. But here's what matters more - how you feel afterward and whether you can maintain the benefits with movement.

Professional-Grade Home Spinal Traction Device
I really don’t recommend inversion tables. I know some benefit from it but they are cumbersome and most can’t really relax while upside down!
Try This Home Traction Device
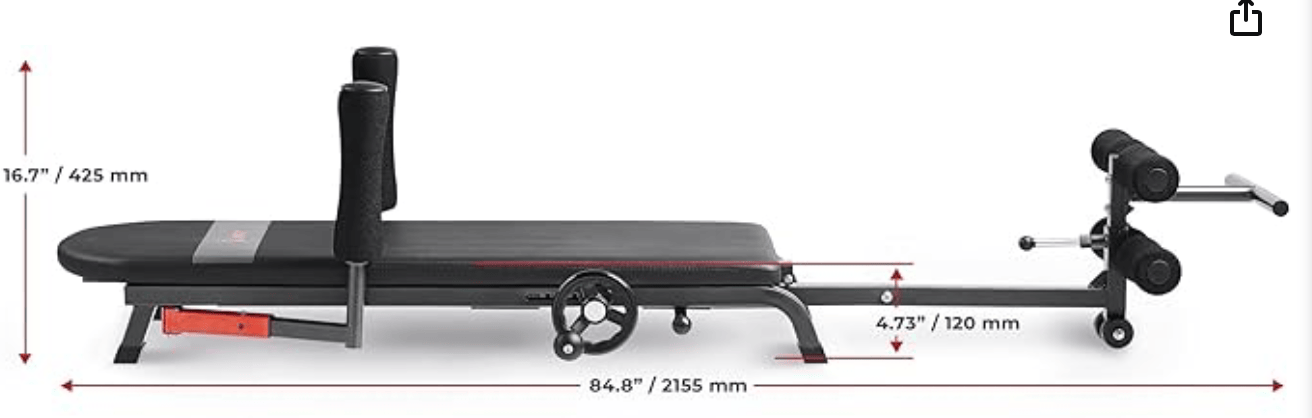
Cost-benefit analysis:
- Relatively cheap
- Professional sessions: $75 each
- Annual savings: $4,800+ for regular users
Clinical advantages over inversion tables:
- No blood rush to the head (safe for hypertension patients)
- No significant ankle/knee stress
- You control the intensity completely
- Lying down positioning feels natural
Real Patient Results
I had a patient spending $7,800 on professional traction at clinic. He bought the self-traction and used it every day before and after walking. It helped him manage his apin better and saved him so many trips to the decompression clinic.
Safety Considerations
Don't use mechanical traction if you have:
- Recent spinal surgery or hip/ankle replacements
- Grade 5 spondylolisthesis
- Active spinal infections
- Uncontrolled blood pressure
- Cannot support body weight in a forward lean
For specific device recommendations and detailed setup instructions, refer to my book "Revision Sciatica" which covers the complete SPARK program and equipment specifications.
How Long Should You Decompress Your Spine?
Based on both clinical research and patient outcomes, the sweet spot is 2-5 minutes total. Some more and some less. These are safe and don’t require muscle activation, so you can do them as long as you need to feel better. But again, on average, it's 2-5 min.
Beginner protocol:
- 20-30 seconds × 3-4 sets
- Rest 30 seconds between sets
- Focus on proper form over duration
Advanced users:
- 2-5 minutes
- Can progress to longer holds if comfortable
- Do during, between, or after workouts
Red flags to stop immediately:
- Arm numbness or tingling
- Sharp shoulder pain
- Increased back pain during or after
The Complete Home Decompression Strategy
Traction alone won't fix your back. Here's what I have my patients do:
Before Traction:
- Mobility work
- Gentle stretches
During Traction:
- Focus on complete relaxation
- Breathe deeply
- Never force the stretch
After Traction:
- Immediate movement
- Targeted strengthening exercises
- Nerve glide techniques
This is crucial: The window of pain relief from traction is when you improve your mobility, strength, and nerve health.
What Is the Difference Between Spinal Decompression & Traction?
This confuses patients constantly. Let me break it down:
Traction: The mechanical pulling force isapplied to your spine. Can be manual (therapist pulls) or mechanical (machine pulls). Some force applied to your spine.
Spinal Decompression: The physiological result - actual space creation between vertebrae and pressure relief on nerves. Which is actually much less than people think!
Key differences:
- Traction is the method
- Decompression is the outcome
Clinical vs. Home Reality: Professional units provide controlled, measurable traction forces. Home methods rely on gravity, body weight, and positioning. Both can achieve decompression, but home methods require more attention to technique. Home methods are also much cheaper and more convenient.
The research I cite in my book shows that combining traction with exercise beats traction alone. This is why I never recommend traction as a standalone solution.
You should do workouts like this to support spine and hip health.
The Best Sleeping Position for Spine Decompression Depends on Your and What is Causing the Pain.
For those with back pain from stenosis, I recommend a flexion-based sleeping position, like on your side. For example, If you have primary left-sided pain, then sleeping on your right will decompress the left side.
For those with back pain from disc issues, positions such as lying on your back can be very uncomfortable, and lying on your belly can feel better. But this does increase pressure on the joints, so most opt to sleep on their sides.
If you are not sure what is causing your pain, then take my free assessment!
Side Sleeping (My Top Recommendation)
- Hips towards your chest
- Knees slightly bend
- Pillow between knees
- Neck pillow
Summary
Home spinal decompression is a practical, affordable tool for managing back pain when done correctly. The three primary techniques —Swiss ball decompression, standing counter traction, and dead hangs —can achieve absolute spinal separation of around 3mm when performed with complete muscle relaxation for 2-5 minutes. Remember that traction provides temporary pain relief, not a permanent cure. The key to lasting results is integrating decompression with strengthening exercises, nerve glides, and proper movement patterns as outlined in the SPARK program. Whether you're dealing with sciatica, stenosis, or general back stiffness, these techniques can save you thousands in professional session costs while giving you the control to manage your symptoms at home. Always stop if you experience shooting leg pain, and consider these methods as part of a comprehensive approach to spine health rather than a standalone solution.
I’ve learned that lower back spinal decompression can be a total game-changer—when done the right way. With just a few simple techniques —like using a Swiss ball for decompression, performing self-traction on a countertop, or investing in a reliable home traction device- you can create real space in your spine right from home.
The best part? It doesn’t have to be complicated. Once you’ve addressed conditions like sciatica, stenosis, or herniated discs, these methods can easily become part of your daily routine. Safe, effective spinal decompression can happen right in your living room, no fancy equipment or considerable expense required.
Here’s why it matters: relieving pressure through spinal decompression can make a significant difference in managing pain and improving mobility—but there are a few key things to keep in mind before you get started.
How Do I Decompress or Traction my Lower back?
I often use the Swiss ball because it’s easy to use and I have it in my garage. There are a few ways you can do it, but I have found that the Swiss ball or even the counter top method is rapid and effective. After doing all of these with my clients. Here’s what I recommend.
- The Swiss ball method for those who have arthritis and general stiffness.
- The counter top method for those who have a lot of upper body strength.
- The decompression device, if you want that little extra pull and separation (not an inversion table!).
Swiss Ball Lumbar Decompression (My Personal Favorite)
What you need: 65cm Swiss ball
As an Amazon Associate I earn from qualifying purchases
Setup:
- Belly on top of the ball, head down
- Arms hanging down naturally
- Feet and knees touching ground for safety
- Completely relax
The key: Complete muscle relaxation. I tell patients to "relax everything from your toes to your tongue."
Safety rule: No pain down the leg. Back discomfort can be normal, but if you feel shooting pain in your glutes, hamstrings, or calves, stop immediately. This indicates nerve peripheralization. If your back is sore, try breathing into it!
Duration: Start with 1 minute, work up to 5 minutes as comfortable.
In my experience, patients who combine this with nerve glides see the best results. It's part of what I call the SPARK program - Strengthening, Pain relief (traction), Activating the nerve, and Regaining mobility, Keep Moving. It’s all laid out in my book Revision Sciatica - This is the go-to guide for complete relief and future prevention of sciatica!
Standing Lumbar Traction On Counter
No equipment needed!
- Find a sturdy surface near waist height like a counter top
- Shift your weight into your hands and lean forward slightly
- Slightly bend your knees and relax your body
This can be done in so many different places!
Dead Hang Method
Equipment: Pull-up bar and step stool
Technique:
- Use the stool to grip the bar without jumping
- Hands just outside shoulder width
- Keep feet on the stool initially
- Gradually bend knees to transfer weight to the bar
- Never fully hang if you have shoulder issues
The most common mistake I see: People try to hang with full body weight immediately. Start with 50% weight transfer for 20-30 seconds.
In my book "Revision Sciatica," I discuss how research shows that around 3mm of spinal separation can be achieved with proper traction. But here's what matters more - how you feel afterward and whether you can maintain the benefits with movement.
Professional-Grade Home Spinal Traction Device
I really don’t recommend inversion tables. I know some benefit from it but they are cumbersome and most can’t really relax while upside down!
Try This Home Traction Device
Cost-benefit analysis:
- Relatively cheap
- Professional sessions: $75 each
- Annual savings: $4,800+ for regular users
Clinical advantages over inversion tables:
- No blood rush to the head (safe for hypertension patients)
- No significant ankle/knee stress
- You control the intensity completely
- Lying down positioning feels natural
Real Patient Results
I had a patient spending $7,800 on professional traction at clinic. He bought the self-traction and used it every day before and after walking. It helped him manage his apin better and saved him so many trips to the decompression clinic.
Safety Considerations
Don't use mechanical traction if you have:
- Recent spinal surgery or hip/ankle replacements
- Grade 5 spondylolisthesis
- Active spinal infections
- Uncontrolled blood pressure
- Cannot support body weight in a forward lean
For specific device recommendations and detailed setup instructions, refer to my book "Revision Sciatica" which covers the complete SPARK program and equipment specifications.
How Long Should You Decompress Your Spine?
Based on both clinical research and patient outcomes, the sweet spot is 2-5 minutes total. Some more and some less. These are safe and don’t require muscle activation, so you can do them as long as you need to feel better. But again, on average, it's 2-5 min.
Beginner protocol:
- 20-30 seconds × 3-4 sets
- Rest 30 seconds between sets
- Focus on proper form over duration
Advanced users:
- 2-5 minutes
- Can progress to longer holds if comfortable
- Do during, between, or after workouts
Red flags to stop immediately:
- Arm numbness or tingling
- Sharp shoulder pain
- Increased back pain during or after
The Complete Home Decompression Strategy
Traction alone won't fix your back. Here's what I have my patients do:
Before Traction:
- Mobility work
- Gentle stretches
During Traction:
- Focus on complete relaxation
- Breathe deeply
- Never force the stretch
After Traction:
- Immediate movement
- Targeted strengthening exercises
- Nerve glide techniques
This is crucial: The window of pain relief from traction is when you improve your mobility, strength, and nerve health.
What Is the Difference Between Spinal Decompression & Traction?
This confuses patients constantly. Let me break it down:
Traction: The mechanical pulling force isapplied to your spine. Can be manual (therapist pulls) or mechanical (machine pulls). Some force applied to your spine.
Spinal Decompression: The physiological result - actual space creation between vertebrae and pressure relief on nerves. Which is actually much less than people think!
Key differences:
- Traction is the method
- Decompression is the outcome
Clinical vs. Home Reality: Professional units provide controlled, measurable traction forces. Home methods rely on gravity, body weight, and positioning. Both can achieve decompression, but home methods require more attention to technique. Home methods are also much cheaper and more convenient.
The research I cite in my book shows that combining traction with exercise beats traction alone. This is why I never recommend traction as a standalone solution.
You should do workouts like this to support spine and hip health.
The Best Sleeping Position for Spine Decompression Depends on Your and What is Causing the Pain.
For those with back pain from stenosis, I recommend a flexion-based sleeping position, like on your side. For example, If you have primary left-sided pain, then sleeping on your right will decompress the left side.
For those with back pain from disc issues, positions such as lying on your back can be very uncomfortable, and lying on your belly can feel better. But this does increase pressure on the joints, so most opt to sleep on their sides.
If you are not sure what is causing your pain, then take my free assessment!
Side Sleeping (My Top Recommendation)
- Hips towards your chest
- Knees slightly bend
- Pillow between knees
- Neck pillow
Summary
Home spinal decompression is a practical, affordable tool for managing back pain when done correctly. The three primary techniques —Swiss ball decompression, standing counter traction, and dead hangs —can achieve absolute spinal separation of around 3mm when performed with complete muscle relaxation for 2-5 minutes. Remember that traction provides temporary pain relief, not a permanent cure. The key to lasting results is integrating decompression with strengthening exercises, nerve glides, and proper movement patterns as outlined in the SPARK program. Whether you're dealing with sciatica, stenosis, or general back stiffness, these techniques can save you thousands in professional session costs while giving you the control to manage your symptoms at home. Always stop if you experience shooting leg pain, and consider these methods as part of a comprehensive approach to spine health rather than a standalone solution.
%20Blog%20thumbnails.jpg)


